Wetas are fairly bullet-proof and the original prototypes and some early boats are still regularly raced.
There’s not much to worry about with a used Weta. These boats don’t break easily. Here are some things to look for when buying one:
Introduction
Weta Marine have a policy of evolution of the boat and there are some key milestones to look for.
Generally later boats, built by Xtreme Sailing Products from 2014 (>#1000), are better built that earlier Chinese-built boats where Weta had to employ a QA person in the factory to pick up errors.
Chinese-built boats have a horizontal seam along the floats where the two halves were joined together. Boats built by XSP have a seamless join like a surf ski.
As well as replacing items which have worn due to wear and tear or corrosion (carefully inspect any steel screws into carbon for galvanic corrosion), the quickest way to upgrade an older boat is to replace the sails, especially the Square Top Mainsail and add the Self Tacking Jib (if you are solo sailing). The Self Tacking Jib kit includes the track which can be glued to the deck without screws (with the correct MSP adhesive). The Twin Tiller kit also makes tacking and gybing much easier and if you sail with crew, it means they are less likely to get poked with the tiller extension. If it has an original furler they are prone to corrosion , we recommend upgrading to the Ronstan RS006000A which uses stainless steel bearings.
The hull/sail number, place and date of manufacture is included on the builders plate on the side of the cockpit. There is a second plate under the transom bar on Chinese made boats and stamped into the gelcoat on boats made by XSP in Indonesia.

Bow
The main hull may have some impacts at the bow from beaching. Gelcoat scratches can be repaired fairly easily but any impacts that have gone through to the fibreglass may need professional help.
Bowsprit
Does the bowsprit (prod) seat firmly in the hole? Press it firmly in and try to sense any sogginess or crunching. A head-on crash into an immovable object, such as a pier/piling or dock, can damage the bulkhead at the aft end of the bowsprit tube causing it to leak.
It’s worth pouring some water down the tube to check for leaks as this is a good indicator of damage. Slight leaks can indicate wear from sand etc at the base of the tube. Check also inside the boat (using the inspection hatch if fitted) for any pieces of hardened resin which may have cracked off in an impact.
A small video camera on a pole (e.g. $99 Drift Ghost X) is a great tool for inspecting inside the boat and bowsprit tube.
Bowsprit tube showing damage
If the damage is slight and the bowsprit is still firmly fixed, this can be repaired by lining the tube with a rolled polythene sheet and using a paintbrush attached to a pole, place a patch of carbon cloth infused with thickened epoxy resin at the base of the hole.
If the damage is more serious and the bowsprit moves when wiggled, the repair may require cutting a hole in the deck which can be expensive to fix.
Check that the gennaker pole has a plug on its inboard end.
Forestay
If the bow triangle for the forestay uses stainless steel eye bolts, look for rust underneath. Consider replacing with dyneema as the newer boats have done. The existing bolt holes may require counter-sinking to remove any sharp edges.
The lower ends of the forestay and side stays have pressed bronze fittings that can corrode and fail, so inspect them for signs the stainless cable is in trouble. Also check the stays for wire that has started to fray. Replacements are available from Weta.
Stern
While the bow is strong, the lip on the stern is fairly fragile and impacts may cause the lip to de-laminate. This can easily be rectified with epoxy resin and clamping the sections together while it cures.
Rudder
A few rudder housings had a poor connection with the carbon tube that makes the tiller. Make sure there’s overlap of tubing material with the two sides that hold the rudder.
Check the rudder stock for damage where the rudder blade hits it in the up position.
Check the rudder blade for damage where the adjustment rod attaches. Superficial cracks may be OK, but cracks right through the carbon may indicate a new blade is required.
If the beam supporting the top rudder gudgeon has been stepped on, or has been used to lift the boat, you may find cracks there.
Float Arms
Check the in-board ends of all four tubes for cracks. Most boats now ship with end caps, some of the early boats didn’t have them. Cracked tubes can be mended if the cracks don’t extend too far outboard.
The 10mm thick gelcoat around the 90-degree elbow/knee of the beams tends to crack. If you see cracks there, forcefully wiggle that joint with all your strength. if there is no movement, then the carbon/epoxy underneath are fine and you have no worries. Check the elbow joints for any movement by putting the float upside down on the trolley and pushing apart the joint – even a small opening can allow water down the tubes into the float. Also check for hairline cracks in the upright tubes. If there are no cracks in the tubes, a flexible sealant/adhesive (Fixtech Fix 15, Bostick MSP, 3M 5200) may be enough to prevent water ingress.

Vertical crack
Note: If you hear a loud cracking sound while sailing the boat, a crack in the ama arms or damaged elbow is the most likely cause.
Cracks can be repaired using a resin-infused carbon “bandage” after grinding off the gelcoat reinforcement. Repair costs could be negotiating points for you here, too.
Note: A handful of boats were accidentally built with the orientation of the carbon fiber in the beams layed out incorrectly. Cracks formed despite the plastic end plugs because only 30% of the fibers ran longitudinally instead of 70%. simple to fix with a kit from Weta Marine that involves epoxying an internal reinforcement tube.
Float Beam End Plugs
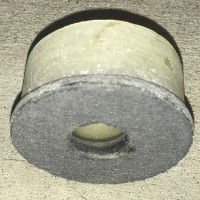
Original boats had no plugs but it was soon realised that some support was needed. A small rubber insert was included but it was found that these would gradually come loose over time due to prolonged immersion and movement. Eventually in 2020, Weta developed their own 5cm plugs made of fibreglass with a felt pad on the end. If you have a boat with rubber plugs that keep falling out, consider upgrading to the current plugs.
Floats
Check for damage on the bow of the float – small chips can be repaired with gelcoat filler. Larger repairs can be fixed easily by a competent fibreglass repairer.
Check for cracks and a softening of the fibreglass just aft of the shroud attachment (where someone might sit on the float). Enthusiastic hiking from the floats can cause the fibreglass to soften, particularly on early boats below around #400 as the floats were reinforced with more fibreglass on later boats. Flexing can be cured by applying a patch of carbon fibre cloth laid over the fibreglass to create a “saddle”.

Cracks in float from hard hiking
Check the ports on the end of the floats for leaks by pouring 5 litres of water into the float and then standing it on end – if water leaks out of the port under pressure then it will leak in when you are sailing. Check the o-rings in the port for damage (replacements are available).
If you have leaks or damage to the port then replace them with Nairn ports which have been used since 2015 (although any 4″ port will do). They seal better than the originals. Attach the hatch to the float (so you don’t lose it) using a length of 2mm line screwed in with one of the screws around the perimeter and then to the hatch by drilling a hole in the hand grip – (NOTE don’t drill through the port as this will cause a leak.)
If you have a mystery leak in the float, try putting soapy water made with washing up liquid on the joints and ports and then blow into the rearmost ama tube as this has a breather hole inside the ama – later boats (>2000) have omitted the breather hole but you can add one by drilling a hole in the arm through the port. Any bubbles will indicate the leak location.
You can also rectify many of the leaks through the ports by cutting an additional foam rubber gasket from 2mm thick crafting foam.
Mast
Inspect the entire length of the mainsail bolt rope track up the mast. If there are significant portions that are cracked or broken off, smoothly hoisting the sail may be difficult.
Replacement mast track is available and can be fixed in place in 30 cm (minimum) lengths using specialist flexible adhesive (e.g. Sikaflex 252, Selly’s Armourflex, 3M 5200, Fixtech Fix 2). Don’t use epoxy glues as you may need to replace the track in the future.
Look for cracks or damage to the joining ends that slot together. Make sure the two sections of the mast fit together with a snug fit. Cracks here can be repaired fairly easily but can affect the bend of the mast.
Check that the mast has a plug on the base (replacements available from Weta). Some very early boats didn’t have one.
Check the pulley at the top of the mast. The pulley should run easily but there should not be enough room for the halyard to slip off the pulley and onto the spindle. This can be fixed by either building up the sides of the pulley slot or replacing the pulley with a wider sheave (available from Ronstan).
Check that the main sail can slide into the mast track and be hoisted all the way up without difficulties. Also check that it doesn’t jump out of the track at the base (particularly with the Square Top Mainsail) as this may indicate the track is worn or has opened up in hot weather (try using a hair dryer to warm it and then close it up). You may have to replace this segment of track or, for a more permanent solution, replace the bottom 40cm with aluminium track from the 29er or try sewing in a nylon “slug” into the foot of the sail below the bolt rope.
Tiller
Stainless steel screws that attach the tiller extension to the tiller tube tend to rust away and then fail without warning. Remove the tiller extension from the tiller (it should slide out if the cover is removed) and check the screws for corrosion. Consider replacing them if you buy the boat, and then repeat that every couple of years.
Check the tiller extension for tears in the rubber of the flexible joint – easy to replace.
Sheets and Halyards
Check all lines for wear – you’ll need to replace any that are worn out. Also check all the short lines that secure the mainsheet to the cockpit deck, the tramp lines, the spinnaker blocks and the forestay line.
Check the spinnaker sheet for wear where it goes through the blocks.
Check the jib and mainsheets where they are usually cleated for wear.
Check that the attachment of the main halyard to the wire strop isn’t worn or coming undone.
Standard replacement rope lengths can be found on the Weta website here.
Trampolines
Check the trampolines for tears and wear on the seams. They last a long time if kept protected from the sun when not being used.
Main Hull
Carefully look inside the boat and along the hull for signs of repair: gelcoat that doesn’t quite match, and so-forth. A good repair can be as good as new, but if the boat has had an accident, you want to be sure it has been properly repaired.
Does it have an access hatch into the main hull between the dagger board and mast step? Older boats did not. it is quite handy to store stuff there. Current boats are supplied with a Nairn 9″ port but the Hobie Kayak port is a larger alternative that also seals well. Armstrong ports seal completely and some people have used a yacht-style hinged hatch, especially for long-distance cruising or marathon events.
Have there been any non-standard holes drilled in the boat? – for an altered mainsheet setup for example or flipping the trampoline blocks around backwards.
Check that the hatch in front of the daggerboard (if fitted) seals properly. If it doesn’t replace the seal or hatch.
Daggerboard & Slot
How does the daggerboard look? Surface scratches can be repaired easily with filler but the tip and trailing edge is prone to damage caused by leaving the daggerboard half down when hitting an object or beach.

Typical daggerboard damage
This can be repaired fairly easily using the directions in the video on the maintenance area of the Weta website here.
Turn the boat over and look for cracks around/inside the daggerboard case. Hairline cracks in the gelcoat don’t indicate there is a structural problem, and may be nothing to worry about.
Furler
Does it have the new continuous furling gennaker drum (KZ or Ronstan) or the old non-continuous (Harken) version?
For recreational sailing the Harken drum furler is adequate and you can add a 1:2 ratio to make furling easier – although a continuous furler is a better solution.

2:1 furling system for Harken furler
For racing you’ll need to upgrade to the continuous furler as in strong winds the drum furler won’t furl.
Weta went through continuous Furlers from KZ, Harken and then Ronstan – all have had problems with the seal on the sealed bearings allowing moisture to penetrate the bearing causing it to corrode and size up with age. (Probably not helped by having the furler on the end of a pole which is continuously dipped in the water and then stored in a sail bag with a moist sail without being rinsed with fresh water)
Make sure the furler, cleats and blocks all turn easily and the teeth aren’t worn. If the furler or top swivel don’t turn easily, you’ll need to source the updated Ronstan RS006000A furler (available from Weta dealers or Ronstan direct) which has a stainless steel bearing that doesn’t corrode and the seal has been removed which allows it to spin freely.
Sails
Check for signs of wear in the sails, especially if you’re considering racing competitively. 5 years of regular sailing is probably about the most you’ll get from a set – less if raced frequently. Creases at the luff near the mast are typical of the Gastra main sails but they should mostly pull out with Cunningham tension.
Batten pockets can wear right through on the main where they touch the shrouds and will need professional repair.
Check for holes in all sails and repairs in the screecher that have been repaired with spinnaker tape.
Battens
Look for broken battens in the jib (which are actually a pain to replace as they are sewn into the pockets).
Look for broken battens in the main.
Dolly
Look for cracks in the dolly near the axle and bends in the frame between the axle and rear support.
Trailer
Inspect all welds on the road trailer (if included).
Miscellaneous
You want to see the boat fully assembled and make sure no parts are missing, and that all parts fit together.
Rig the boat with a neutral mast rake and take the boat out for a sail. Does it like to turn left? That is, on starboard tack or gybe does it have lee helm, and port it has weather helm? This may be because the port float is bow down with respect to the starboard one.
Don’t be too concerned about faded gelcoat especially with darker colours or yellow hulls – if can be buffed back to colour using a rubbing compound or recoated.