- This topic has 0 replies, 1 voice, and was last updated 4 years, 5 months ago by
.
-
Topic
-
One way to have your Weta ready to go is to have your own dock. Note that there’s a strap around the hull and another at the ama arms. While you can lift the boat from the water using the arms, it’s not advised to leave it suspended from them permanently.

If you use a crane to launch your boat, then suspend it with the bow down as this keeps the crane jib clear of the mast and stays.

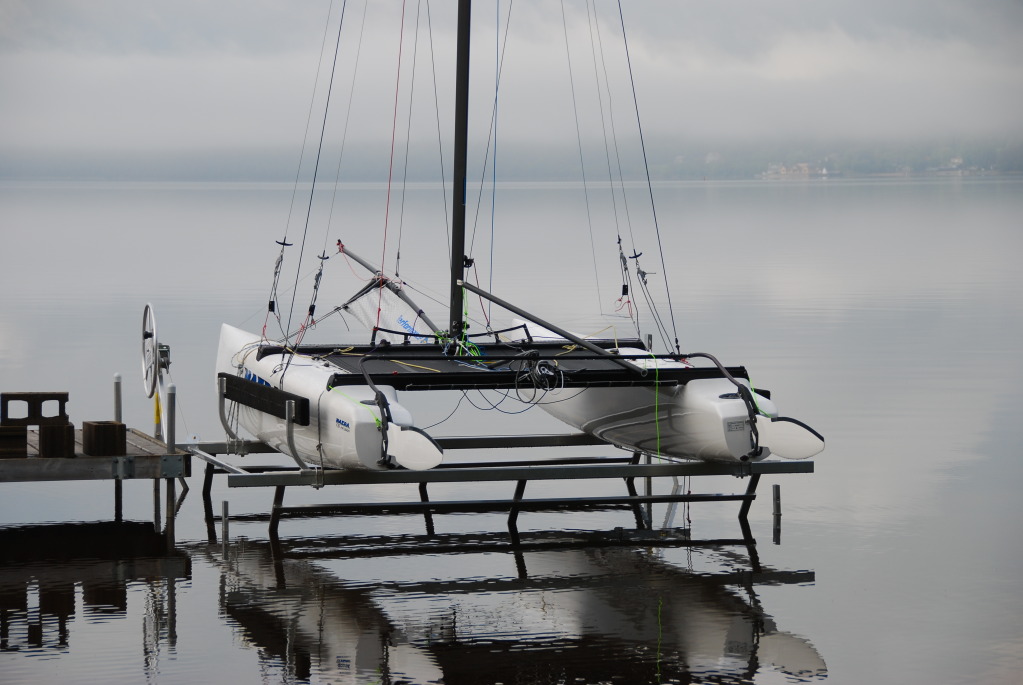
Another solution is to use a floating dock to put your boat above the water – the version below has a mechanical system to lift the frame and boat clear of the water.

There are also modular floating dock systems with built-in rollers and a winch which could be used to lift your boat clear of the water.

Dock launching
But what if there is no beach or facility to launch your boat apart from a public access dock (see below).
This dock was my launch site for the first 2 years of Weta ownership – the benefit was it was close to home – the downside was working out a way to safely launch and retrieve the boat.

Preparation
You will need to do some measurement and preparationMy 2009 boat (325) was 1.98m wide on the trolley (once I had removed some padding from the end of the mooseheads) – the gantry to access the dock was 2m wide. The 2015 trolley’s with the removable ends are slightly narrower.
You will need two 10m dock lines which you can attach to each float arm upright (instead of tying them on each time, I created a bowline in the end and looped the line it through the bowline as I could do this one-handed).
You will need fenders – the best solution I found was to use hollow pool noodles with bungee cord threaded through them and a clip attached. This allowed me to clip them to the amas secured to the arms. I also acquired some large foam rollers used for exercise and strung them together to make a temporary floating barrier and keep the boat away from growth along the dock edge which could scratch the gelcoat.
You will also need deck cleats to tie up to – both on the corners of the dock and also in the middle to secure the trolley when retrieving the boat (see below).


Having surveyed the site and ensured you can get access, rig and launch your Weta – this is the process I used.
- Roll your Weta onto the dock.
- Positioned the boat so you can get around it (you may need to move it during the process)
- Rig the boat in the normal way taking care not to drop any small components over the edge
- Decide which direction you are going to launch the boat – you will need to end up with it pointing into the wind although you can secure it at the bow away from the dock (without the jib) if you loop a dock line over the bowsprit or furler to keep it head to wind.
- Deploy your fenders securing them around the float so that they will not move if they rub against the dock.
- Tie dock lines to the ama arms and coil them ready on the tramp.
- Do not hoist the sails unless you are planning to sail away immediately – they can make the boat hit the dock with considerable force and cause damage to the floats.
- Tie the trolley axle to a deck cleat to stop the trolley rolling off the dock – either to one cleat in the centre or one either side.
- Hold one or both of the dock lines and lift the front of the trolley to tip the boat into the water – lifting the bowsprit so it doesn’t catch on the trolley in the process.
- Stow the trolley out of the way but close enough so you can use it to retrieve the boat on your return.
- Use the dock lines to tie it firmly alongside the dock to the deck cleats – any slack can allow a gust of wind to cause the bow or stern float to collide with the dock.
- If you haven’t already changed do so before you hoist the sails.
- Hoist the mainsail first by sitting next to the mast so you can pull on the halyard and help feed it into the track at the same time.
- NOTE Do not tighten the Cunningham until you are about to sail or sailing as this will power up the rig and may cause the boat to collide with the dock. Do not hook the mainsheet on until you are ready to go for the same reason.
- Sit on the foredeck facing the bow with your feet either side to attach the jib to the forestay with the clips – turn around and face the other to hoist the jib. Don’t cleat the jib sheets.
- Tip: Put the boat hove-to after launching to stow fenders and lines – don’t worry about stowing them before you leave.
- Get the boat ready to go including putting the daggerboard and rudder down and clip on the mainsheet to the clew of the mainsail.
- Sit on the dock with your legs hooked over the nearest float while you untie the dock lines from the deck cleats and coil them up ready to stow in the boat.
- Push off and get on board making sure you sailing away from the dock and avoiding any moored boats.
- NOTE Do not start stowing dock lines, making changes to the rig, removing fenders etc until you are well clear of the dock and moored boats. A moment’s inattention with your head in the boat can lead to a costly collision.
- Put the boat hove-to to enable you to stow ropes and fenders (keep the jib cleated when you tack so it’s backed on the new tack, let out the mainsheet completely and loop the genneker sheet around the tiller extension so that the boat is steering up into the wind).
- Enjoy your sail!
Retrieval (see video below)
Launching is fairly easy, getting the boat back to the dock and onto the deck is more complicated. If it’s gusty, pick your moment and wait for a lull.- When you are returning, put the boat hove-to again and get fenders and dock lines ready. Depower the mainsail by easing the cunningham.
- Sail back to the dock and if possible approach it from downwind so you have control over your speed by easing the sail.
- Tip: You are going to need to grab the dock when you get to it, so consider sitting on the wrong side of the boat so you are close by to jump off with the dock lines when you get there.
- If you find you are approaching too fast or you have stalled with no steering, consider going around again by tacking away rather colliding with the dock. Learn to back the main by grabbing the clew with your hand to slow your approach but don’t overdo it so you stall out and loose steering.
- Once you get to the dock jump onto it with the dock lines and sit down with your legs over the float as before – then tie the dock lines tight to the deck cleats at either side so the boat cannot twist around and collide with the dock.
- Drop the sails and roll them up into the boat then put them on the dock out of the way with the daggerboard. Put the rudder up – you can remove it but it’s easy to loose the pin over the side!
- Once the sails are down and they and any additional weight are out of the boat, get the trolley ready by tying it to the deck cleat at the axle so it can’t go over the side of the dock or roll backwards – you want the rear support to be over the water.
- Use the dock lines to turn the boat so it is bow on to the trolley – lift the front of the trolley to drop the rear support so that the bowsprit can go over it and grab the bowsprit – use the bowsprit and bow to lift the bow of the boat onto the rear trolley support. Tip the boat up at the bow so you can get more of it onto the trolley support. At the point when the bow is level with the front trolley support, you can put your weight on the front of the trolley to lever the boat out of the water onto the dock.
- Slide the boat fully onto the trolley and then get under the tramps to untie the trolley from the deck cleat.
- Derig the boat as normal and stow on the trolley.
- Don’t forget to take all equipment and temporary fenders with you when you leave the dock.


- You must be logged in to reply to this topic.